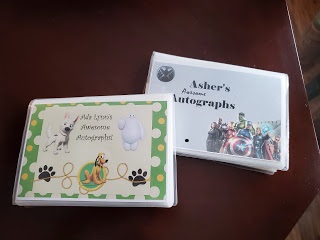
I have a confession. I've never purchased an autograph book when I traveled to Disney. I know there are a lot of options when it comes to buying a pre-made autograph book...you can get so many different kinds; Princess versions, Fab Five versions, Pixar versions....so why did I make my own each time we traveled? The short answer: I never wanted to run out of an autograph page! I always had this horror that if I bought a pre-made autograph book that I would be standing in line with one of my kids to get an autograph of a character and we'd be flipping through the book and we'd find we had no more pages for someone to autograph! That's really the only reason. Those pre-made ones are gorgeous and super easy, and in a pinch I would have totally grabbed one to use.
But, if you have a few extra minutes before a trip, you can easily make your own with some card stock, a paper cutter, and a small 4x6 photo album from the store. I purchased my albums from Michaels, but you can find them at Target, Walmart, Dollar Tree....pretty much anywhere. You'll remove the pretty front cover that comes with the album.
From there, cut the card stock you have into 4x6 or 3x5 pieces and voila - an autograph book! When I've been pressed for time, this is literally all I've done before! But, when I have more time on my hands I've decorated the pages a little more. You could use any sort of stamps, stickers, or digital program to decorate each individual autograph page as well as the cover.
From there, cut the card stock you have into 4x6 or 3x5 pieces and voila - an autograph book! When I've been pressed for time, this is literally all I've done before! But, when I have more time on my hands I've decorated the pages a little more. You could use any sort of stamps, stickers, or digital program to decorate each individual autograph page as well as the cover.
You could also take it up a notch and get a "beefier" book, though I've never done this. I would still suggest you stick with 4x6 as your size. You could always go a little smaller if you could find something, maybe 3x5, but anything larger starts to become a bit much to handle at the Parks!

While you're shopping, be sure grab a small clipboard. My clipboard is approximately 6x8. If all you have is one of the larger ones, that's ok, but again - think about ease at the Parks.
One of the neat things about having a decorated card for us has been that it creates a fun interaction between those characters that will talk and my kids! The Princesses especially love to see themselves on a card, or will comment on a really pretty card. Once at Disneyland, we met Belle twice on the same day. She even commented that when she had autographed a card earlier in the day, it had been a different one!
That's really all there is to it! Then when I get home, I print pictures of each character from the moment they signed and place it in the opposite spot from where their signature is. I will also use their signature card on scrapbook pages sometimes by scanning the card in and placing it on a digital scrapbook page. Below are a few examples of some of the cards and covers I've made. I will usually do a new book for each trip, but as the kids have gotten older, we do less meet & greets, so we do not need a new book for each trip - we can just add the one or two we get from a trip onto the most recent book.
 |
| Covers were made with clip art from the internet and my digital scrapbook program |
To recap...What you need:
*Paper Cutter
*White (or light colored card stock)
*items to hand decorate or digitally decorate (optional)
*4x6 plastic photo album
*small clipboard
*colored sharpies or thick pens (easier for those characters with large hands to hold)
*large gallon sized baggie to put them in while you're traveling!
*Photos with the characters who signed after you get home (optional)
Have fun! And if you have any questions, drop me a note! I'd love to know if you've made a homemade autograph book as well!


Comments
Post a Comment